Fun Shaped Bath Bombs For Kids

Splish splash we love takin’ baths!
Turn bath time into a fizzy, fun, magically creative experience by surprising your kiddos with a fun bath bomb diy activity.
Not only do bath bombs add vibrant colors and creativity into the nightly bath time routine, making it together makes for the ultimate bonding time.
While there are many pre-made kids bath bombs to choose from on the market, those usually contain harsh chemicals, additives, and glitter that is not good for children or the environment. Ick!
By choosing makesy products to make your own diy bath bombs, you are in control of the natural ingredients and free of the worries that come with other commercial products.
Makesy ingredients are all-natural, ethically sourced, and eco-friendly so while you're doing something better for your kiddo's skin, you're also doing something better for the planet!
So, are you ready to learn more about homemade bath bombs?
Let’s get started!
first, pick your bath bomb shape
Choosing the components with your kids makes for a super fun and educational experience!
From picking their favorite mold shape to choosing what color eco-dye they want, there’s so much curiosity and creativity to be sparked!
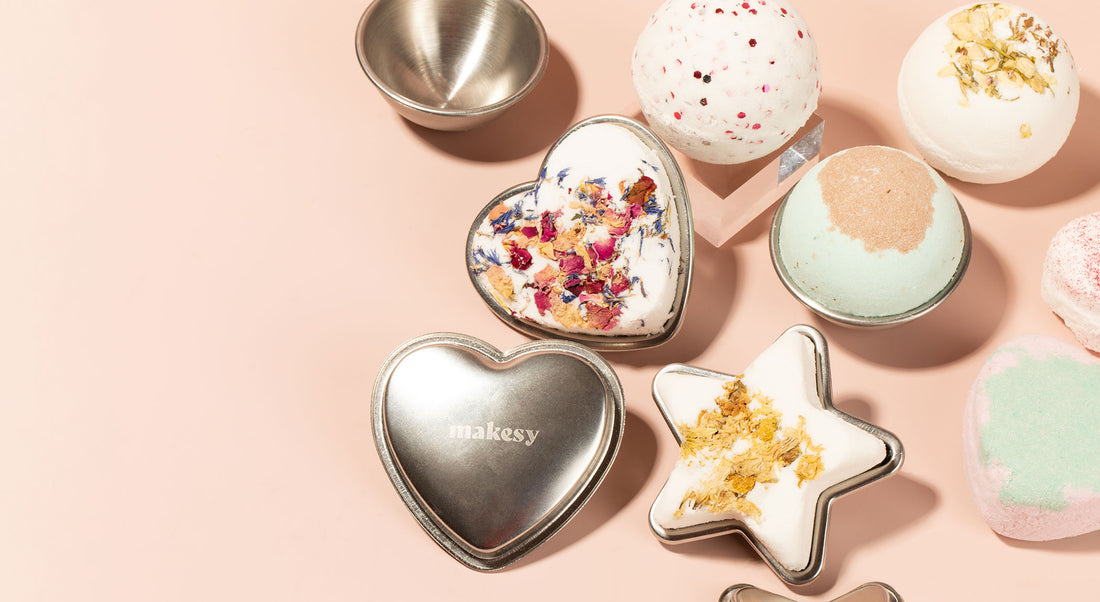
First, you’ll want to choose the shape of the bath bomb. There are so many molds to choose from!
Below are a few kiddo-approved bath bomb molds:
- Heart shaped molds are oh-so “love”ly year-round
- The magical star-shaped molds are the star of the show
- Can’t go wrong with the the classic round mold

add your enhancers
Next, have your kiddo pick out some magical enhancers!
We’ve selected a few of our faves below.
- Skin safe eco dyes: Color your kids world by adding eco-dyes to your bath bomb! Fill the tub with bright colors and let their imagination soar wild!
- Eco glitter: Biodegradable and made from eucalyptus trees, eco-glitter is the bomb! There are SO many different shapes, sizes, and colors to choose from! Can’t decide? Try this discovery kit and play with them all!
- Botanicals: Beautiful, delicate, botanicals are beautiful when added into diy bath bombs!
- Mica powders: Add a subtle shimmer to your bath bombs with one of our colorful micas.
There are endless enhancer choices to level-up bath time like never before!
add a fragrance oil
Lastly, pick out a yummy kid-approved fragrance oil!
The results are in….the kiddos have spoken and recommend strawberry macaron & vanilla whip, and creamy vanilla & coconut sugar, but there are so many delicious scents to turn bath time into a party!
Looking for all-natural fragrance oil? Check out these lovely ones here.
Woah, wasn’t that part so much fun? Just wait! We’ve barely scratched the surface!
Once you’ve picked out all of your components and ingredients, you and your little one can watch this video on kids bath bombs here and get excited to make your own!
Use the recipe below to make the ultimate kid-approved diy bath bombs!
You can even hide a little prize/toy in the mold that will be revealed once dissolved in the bath! How fun is that? Bath bombs are easy to make, customizable, and add major FUN to bath time!

follow our diy bath bomb recipe
Ingredients- bath bomb mold (links above for a few options)
- 4.5 oz sodium bicarbonate (75%) - this is just baking soda!
- 1.5 oz citric acid (25%)
- .05 oz polysorbate
- .1 oz all natural fragrance oil
- 1 ml rosehip oil
- witch hazel base
- eco glitter or other enhancers like mica powder or botanicals
Instructions
- Combine dry ingredients (sodium bicarbonate and citric acid) in a small bowl and mix until you have a fine texture (gloves recommended).
- Add your wet ingredients (polysorbate, fragrance, and rosehip oil) into the mixture with your dry ingredients.
- Fold in hands until the product starts clumping together like wet sand. Spray with a small amount of witch hazel, as needed to provide more structure if you are finding that your consistency is too dry.
- Now is the time to add in enhancers like eco-glitter, eco dye or botanicals to give your bath bomb that pop of color or sparkle! Once you are happy with the color and consistency, you’re ready to move on.
- Begin pressing your mixture firmly into the both sides of your mold until each side is tightly packed.
- Layer a generous amount of product lumped in the center of each side of the mold (this is what will allow the two sides to stick together when you close the mold.
- Wipe away any extra powder at the seams of the mold.
- Match eyelets of the mold and press together.
- Fill mold until the mixture is completely used up.
- Allow your bath bombs to dry and harden for between 2 and 24 hours, then very carefully remove them.
- Ta-da! It's time to go take a relaxing bath!
how to use your bath bombs
Fill your bathtub with water. Drop in the bath bomb. Watch it fizz and fill the tub with color and magic! DIY bath bombs are da’ bomb!
Warning: bath bombs may cause laughter, happiness, and extra FUN! Happy making!