
candle making 101: a simple guide
Candle Making 101: A Simple Guide is your essential primer to the enchanting world of candle making. With a focus on the basics, this guide will walk you through the process of selecting materials, crafting your candles, and adding personal touches. Whether you're a beginner looking to start a new hobby or an experienced maker aiming to refine your skills, this guide provides the foundational knowledge to create beautiful, aromatic candles from the comfort of your home.
key takeaways
- Understanding the different types of waxes and wicks is crucial for crafting candles that burn evenly and effectively.
- Adding fragrances and colors can transform the ambience of a space, making mastery of melting, pouring, and curing techniques essential.
- Personalizing candles with unique vessels, signature scents, and decorative touches allows for endless creativity and the ability to create custom gifts or products.
step 1: choosing your wax and wicks

Alright, candle crafters! Let's dive into the heart of candle making: picking the perfect wax and wicks. Choosing the right materials is crucial for your candle's performance, so don't skimp on your candle making supplies!
When it comes to wax, there's a whole world out there. You've got your soy, beeswax, paraffin, and the list goes on. But have you heard about the Pure Palm Paraffin Candle Wax from Makesy? It's a dreamy blend that's smooth as butter and perfect for all sorts of candles.
Now, for the wicks - it's not just about the burn, baby, burn. It's about the eco-friendly vibes too. Makesy's eco cotton & wood candle wicks are the way to go if you're looking to keep things green. Plus, they've got that lovely crackling sound that makes every candle a little more special.
Remember, the wick you choose should complement your wax type. It's like a dance duo - they've got to work together to put on a great show.
Here's a quick list to keep you on track:
- Check out a wax comparison chart
- Use a wax & base calculator
- Refer to a wick selection guide
And there you have it! With the right combo, you'll be whipping up candles that not only look good but burn beautifully too.
step 2: melting and pouring basics

Alright, candle crafters, it's time to turn up the heat—literally! Melting wax is where the magic starts to happen. You'll want to gently heat your wax to the perfect temperature. Not too hot, or you'll risk a candle calamity! Keep a close eye on the thermometer to ensure you're in the sweet spot for your specific wax type.
Here's a quick rundown on the melting process:
- Chop or break your wax into smaller pieces for even melting.
- Use a double boiler or a wax melter for controlled heating. (Psst... check out makesy's collection of high-quality wax melters!)
- Stir occasionally to help the wax melt evenly.
- Once fully melted, let the wax cool slightly before adding fragrances or colors.
Remember, patience is key! Rushing the process can lead to uneven candles or poor scent throw.
Now, for the pour—steady hands win the race here. Pour the wax into your prepared molds or vessels, avoiding any splashes or spills. Then, let them sit undisturbed in a safe place while they set. This is a good time to clean up your workspace and prep for the next batch of candle goodness.
step 3: adding fragrances and colors

Ready to make your candles smell as good as they look? Adding fragrances and colors is like giving your candles a personality makeover! It's all about mixing and matching until you find that perfect combo that screams 'you'.
For fragrances, you've got a world of candle scents at your fingertips. Whether you're into floral, fruity, or that fresh linen smell, there's an oil for that. And hey, if you're feeling adventurous, why not create your own signature scent? Just remember, a little goes a long way, so start with a few drops and sniff your way to perfection.
When it comes to colors, the rainbow is your palette. Eco dyes, mica powders, or even crayon shavings can add that pop of color you're looking for. But here's a pro tip: if you're using Vybar 260, not only will it help your colors pop, it'll also give your candles that glossy magazine cover look. Plus, it's a champ at reducing those pesky air bubbles.
Don't forget to test your fragrance and color combos in small batches first. It's like a mini science experiment, and you're the mad scientist in charge!
Once you've nailed down your favorites, jot them down in a candle making journal or save them in a digital doc. Trust me, you'll want to remember the winners for your next candle crafting session!
step 4: setting and curing Your candles
Alright, you've mastered the art of setting and curing your candles, but don't rush off just yet! Patience is key when it comes to the final stages of candle making. After pouring your heart and soul (and wax) into your creation, it's tempting to light it up right away, but hold your horses!
Candles are like fine wine; they need time to develop their full character. A good rule of thumb is to let them sit for at least 72 hours. This isn't just a quirky suggestion; it's backed by the pros. For instance, the virgin coconut soy™ candle wax from makesy recommends a cure time of 72 hours to achieve the best fragrance throw. Alway check the recommendations as each candle wax can differ!
Once the time is up, it's showtime! Trim that wick, light it up, and bask in the glow of your handcrafted candle. Just imagine the looks on your friends' faces when they find out you made it. Priceless!
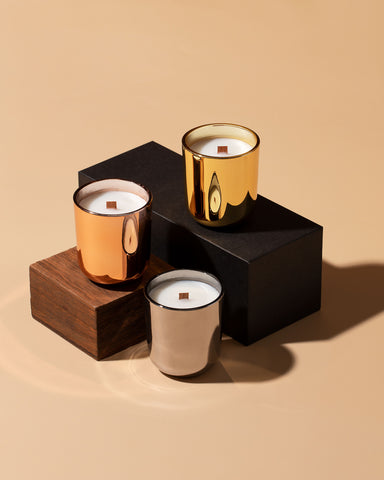
designing unique candle jars

Alright, candle crafters! It's time to dive into the world of candle vessels and how they can transform your candle making from 'meh' to 'wow'! First things first, your choice of vessel is like the outfit for your candle—it's what everyone sees first. So, let's get creative!
- Think outside the box: Who says candles only belong in jars? Explore teacups, plant pots, or even seashells for a beachy vibe.
- Size matters: Match the size of your vessel to the burn time you desire. Bigger can mean a longer, cozy glow.
- Safety first: Ensure your vessel can handle the heat. No one wants a meltdown, literally.
Remember, the vessel you choose sets the stage for your candle's performance and aesthetic appeal. It's not just a container; it's a statement piece!
Now, where to find these trendy containers? From sleek, modern aura candle jars to elegant allures, you'll find a variety of styles to suit your needs. And hey, if you're feeling extra crafty, why not customize your vessels with paint, ribbons, or decoupage? The sky's the limit!
creating signature scents

Ready to make your candles stand out in a crowd? Creating a signature scent is like crafting a personal melody; it's all about harmonizing the right notes. Start by exploring a variety of fragrance oils. You can find a plethora of options at places like Makesy, where they offer an ever-growing collection perfect for DIY candle making.
Here's a fun fact: scents are made up of top, middle, and base notes. The top notes are your first impression, the middle notes are the heart of the fragrance, and the base notes bring depth and longevity. Experiment by mixing different oils to find your unique blend. Remember, it's not just about the scent; it's about the story it tells.
When you've crafted that perfect scent, give it a cool name that reflects its essence. This isn't just a candle; it's an experience wrapped in wax!
Keep track of your experiments with a simple list:
- Top note trials
- Middle note matches
- Base note blends
- Successful scent stories
And don't forget, patience is key. Allow your scents to meld together for a few days before making a final judgment. Your nose knows best, so trust it!
decorative techniques and finishing touches

Now that you've got the hang of making candles, let's jazz them up a bit! Adding a personal touch to your candles can transform them from plain to absolutely fabulous. Whether you're gifting them or keeping them for yourself, a little extra flair never hurt anybody.
Here's a quick rundown of some fun ways to decorate your candles:
- Use eco glitter or mica to add a shimmering effect.
- Embed small objects like crystals, dried flowers, or seashells into the wax.
- Paint the outside of your candle vessels with non-flammable paints or designs.
Remember, the key to a great finish is patience. Let your creativity flow, but also give your decorations time to set properly before moving on.
Once you've mastered these techniques, you can even start thinking about packaging. A well-decorated candle paired with beautiful packaging can make all the difference, especially if you're thinking about selling your creations. Dive into the world of ribbons, custom labels, and unique boxes to find the perfect match for your candle's personality!
packaging and presenting your candles

Alright, candle crafters! You've poured your heart into making those candles, and now it's time to wrap them up with as much love. Presentation is key, and it's what turns your homemade candles into the ultimate gift or a shelf-worthy product. Let's talk about giving your candles the grand unveiling they deserve!
First things first, you'll want to choose packaging that complements your candle's style and scent. Whether you're going for rustic charm with kraft paper and twine or sleek sophistication with glossy boxes and satin ribbons, the packaging should be an extension of the candle's personality.
Remember, the unboxing experience can be just as memorable as the candle itself. Make it count!
Here's a quick checklist to ensure your candles look as good as they smell:
- Sturdy boxes or bags to protect your candles during transport
- Tissue paper or bubble wrap for a snug and safe fit
- Labels with your brand's logo and candle details
- Ribbons, strings, or seals for that extra touch of elegance
And don't forget, if you're selling online or shipping to customers, sturdy packaging is a must to keep your candles in one piece. With a little creativity and attention to detail, your candle packaging will shine as brightly as the candles inside!
conclusion
And there you have it, fellow crafters! You're now equipped with the basics of candle making and ready to light up your world with custom scents and styles. Remember, practice makes perfect, so don't be afraid to experiment with different waxes, wicks, and fragrances. Who knows, you might just create the next bestseller or find your signature scent! With free shipping on orders over $149, it's the perfect time to stock up on supplies and get your candle game glowing. Keep those flames of creativity burning bright and be sure to tag us in your finished creations on Instagram using #makesymade for a chance to get featured on our wall of inspo & win a $100 makesy gift card. Happy making!
